Happy December!!  Yes, that's right - December. A month filled with lights and carols and joy and giving. And if you're in the classroom, add to that a month filled with a little craziness and excitement! We can all use some fantastic ideas for our classroom right about now, so I'm linking up with my friends over at I Teach Second for the first of what will be a monthly linky:
 
This linky is filled with great ideas you can use in your classroom - now and after the holidays!


Sometimes our little ones forget that this month isn't all about them. I go out of my way each year to actually TEACH my students how to be kind, respectful and caring towards others. Although kids can easily share some of the big things they do to show kindness - food drives, helping another student, etc. - they often don't realize that it's the LITTLE things that can count the most.
 
December 1st brings the entrance of a new friend to our classroom... meet the Kindness Elf.

I know that Kindness Elves are not new - I've seen many classrooms doing them now instead of the traditional OTHER elf.  For me, I was looking to use them to show students how they could show kindness every day - even in the little things they did... and that the result of that kindness could be very powerful, even if they didn't know it. I started doing this last year in my room after seeing a blog post from The Imagination Tree. Her post focuses on Kindness Elves at home, but I was inspired to come up with a way to infuse kindness into our classroom.  I decided to create a "Kindness Challenge!"
I found some little elves on Amazon and knew they would be perfect for my little covert operation.  There are 4 different elves and they each have Velcro on their hands - perfect for hanging around the room! (It seems that the price has gone WAY up from last year! I know I did not spend over $20 on these guys!)
The next part was to come up with 18 different ways (yep, that's how many school days till Christmas break!) students could show kindness.  I wanted most of those ways to be easy and quick.  It's going to be the little things that matter when we're trying to develop a culture of kindness. I wanted them to realize that it's not always the bigger things we do that count - it's the little, everyday actions that mean the most.
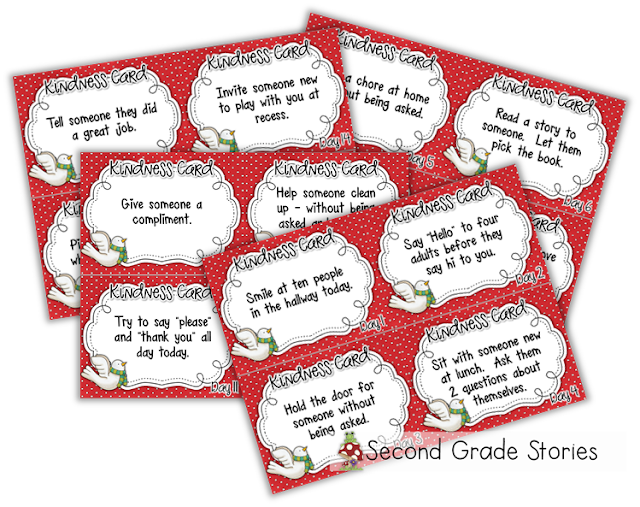
Soooo... after a bit of brainstorming... here are the "Kindness Cards" that the elves will be bringing each day! (You can click on the image to download them - black and white version, too!)
https://drive.google.com/file/d/0B2ize_mAbVGMNWNRWXVEUEhhQ3c/view?usp=sharing

The plan is to have one of the elves bring a card every day until Christmas break.  They might show up in the morning, after lunch or even right before we go home.  I chose acts of kindness that would be easy for my kiddos to do. I also mixed in things they could do at home, as well. Spread the good cheer! Each day, when the elf, appears, we read the kindness challenge card and talked about how we can successfully accomplish it. We also talked about the impact each little act of kindness could have on our classroom, grade level, school and family.
 
I can honestly say the focus and conscious effort on teaching kindness in a meaningful way definitely had a positive impact on our classroom community. I noticed students continuing to do kind things even after Christmas break and they also began noticing when others did something for them.
 
This year, I'm changing it up a bit. I'm still going with the kindness theme, but after seeing this creative poster from Digital: Divide and Conquer, I knew the elves would be replaced by a kindness reindeer!


https://www.teacherspayteachers.com/Product/Remember-to-be-a-Reindeer-Positive-Thinking-Poster-Set-2221454

I printed and laminated (4 to a page) the cards to make the poster, and the reindeer will bring them along on the first day when she makes her appearance. (You can snag the posters by clicking on the image.) I'm excited to start this with my class this year.  I have such a wonderfully caring group of students I know they will really take this to heart.  And who knows - if kindness takes over classrooms everywhere, think of what a huge impact we can all have on our little part of the world!
 
If you're doing kindness elves - or any kindness acts in your classroom, I'd love to hear from you! And be sure to check out some of the other great ideas in the link up!


post signature
Happy Saturday, teacher friends! I hope everyone had a wonderful Thanksgiving, full of food, family and maybe even some Black Friday deals! I'm happy to be writing this post in my comfy clothes and messy ponytail, with a mug of hot chocolate by my side - and the scent of a candy cane candle on the warmer. Bring on the holidays!

I don't know about your kiddos, but mine were just a little out of sorts our last few days before break! I decided to have some fun with our place value review and do something REALLY exciting! I posted this picture on Instagram and Facebook and it got LOTS of attention:

 
That's right! I was inspired by the amazing Hope King over at Elementary Shenanigans to create my own version of Hungry, Hungry Hippos to play with my kiddos - place value style!


Here's what I did: I started by emailing staff and asking if anyone had balls from a ball pit that I could borrow - just the balls, not the pit! I had a few people share enough with me that we had about 250 balls - which does NOT take up much space. I was a little worried there wouldn't be enough balls for everyone, but it worked perfectly. I also went to Dollar Tree and bought some plastic baskets to use for the "catching." I planned on having my students work in pairs, so I bought 9 baskets. (Which of course, I know will come in handy for other things, as well!)

Now to decide how to make this all work! When Hope King shared her take on the game, she had a set of questions tied to each color. When kids came back with their balls, they took one out and answered a question for that color. I originally planned to use that idea and have question sets for expanded notation, adding and subtracting ten, base ten blocks, adding and subtracting multiples of ten and 100, etc. BUT - I had a brainstorm in the shower the next morning. (It's where I do my best work!) Why not use the colors of the balls as the numbers?! For example, in one round, students would collect red, blue and yellow balls. (Up to 12 total) The number of red balls would be the hundreds digit, the blues would be the tens and the yellow would be the ones. Then they could use that number as the basis for answering different questions. It ended up looking like this:

https://drive.google.com/file/d/0B2ize_mAbVGMcnpEOWwzMFJHN3c/view?usp=sharing


I created 4 different sheets - each using different color balls and different questions. I included two sheets at the end where students could choose their own colors, just in case anyone finished early. I put everything into a booklet and we were ready to go!

I placed 9 cones around the perimeter of the gym and assigned each pair of students to one cone. This as their home base and where they had to come back to after they had enough balls. Their job was to count each color and then roll the balls back into the middle of the gym before they started completing the sheet. (I did this so there would always be enough balls in play.) I also had each pair start on a different page of the booklet so everyone wasn't  going after the same color at once.

Ready, set, go!

We started by having one person lay on their stomach on a scooter, holding the basket in front of them, with the other person holding up their legs and pushing them along. That didn't work too well for my second graders! They had a hard time staying balanced and many of them ended getting pushed off the scooter. Most pairs decided having one person sit on the scooter and the other person push them around worked better!


Once they had gathered enough balls, it as back to their home base for some place value review!


My kiddos did a great job staying in control, being safe and just having fun! And I was pleased to see that they really knew their place value skills!

If you're interested in the booklet, you can grab it by clicking the image of the sample page earlier in this post. I'm not going to include the title on the cover because the name of the game is trademarked - but here's the link to the adorable FREE hippo clipart I used so you can make your own cover (or just write on the top of the one I included).

Let me know if you decide to try this out with your kiddos - I'd love to know how it goes!

post signature
Looking for some fun turkey reading for Thanksgiving? I love pairing both fiction and nonfiction when I do a theme, and turkey talk is no exception!


You can check out my blog post about fictional turkey stories HERE. Now let's talk about informational texts.


I'll be honest. I have really only found one good informational turkey book - All About Turkeys, by Jim Arnosky. Which is now out of print. Sigh... I wish I had multiple copies, but I only have one to share with my kiddos. Soooo.... I decided to create my own turkey text!

My kiddos start by thinking about what they already KNOW about turkeys. We make a chart and refer back to it throughout our learning. Then, the new learning begins!


We read through different fact cards filled with information about turkeys. We often use our "Coding Our Thinking" to help us be reading experts. I use these same cards with all three of my small groups, and just change the focus and scaffolding, as needed. One group works on locating information, another on main idea and a third on generating their OWN questions to go with the information.
When I've done this unit during a short week, I usually hang the cards around the room and hang a question card next to each one. Then I have students work in partners to walk around the room,, reading each card and looking for the answer to the question. We then come back together and share our answers, returning to the text (I project the cards on our Smartboard) to highlight where we found our answers.

Later in the week, we do a little true/false sort

and end our turkey talk by writing abut what we have learned (again differentiated)!
My kiddos love learning about turkeys and are proud to go home and share new facts with their families. It's the perfect way to keep everyone focused in those days up to Thanksgiving break!

You can easily create your own turkey fact cards, with research online and any informational texts you might have. If you're interested in seeing my full turkey unit, you can take a look at it in my TpT store by clicking on the image below.
https://www.teacherspayteachers.com/Product/Turkeys-nonfiction-mini-unit-980457


post signature
Happy Tuesday, teacher friends! Do you have a container addiction like I do? I just can't help it. Colorful bins, baskets and trays make me happy - and keep me organized! I blogged over at Who's Who and shared part 1 of this post - see it here.


Now let's get ready for part 2 - MORE ways to stay organized with containers in the classroom!

I have always stored my math materials in plastic bins. But lately I've been a little obsessed with having matching containers and labels. Walmart had these plastic shoeboxes with colored lids a couple summers ago, so I ditched all my old containers and used these. Having them all the same size really helped me fit more containers on the shelf. And the labels make it super easy for me - or my students  to find when we need. I also condensed what I had (who needs 50,000 pattern blocks) by sharing with other teachers or putting less-used items in our grade level hallway closet. This freed up space for me to keep out only what I used most often. I have a similar shelf on the opposite side of this space with language arts materials. (link to the labels here)

TIP: Keep out only the things you really use. If you use something only one or two times a year, store it out of sight in a closet or somewhere so you can declutter and make room for what you truly use!

Speaking of math materials - I started storing all my centers and small group activities in these bins. LOVE! I bought a few more this year and separated some topics out (Ex. Place value used to be just one tub, but I had so many thing its was hard to put the lid on! Now there is one tub for 2-digit place value and one for 3-digit.) I can't remember exactly where these tubs came from - has to be either WalMart or Big Lots (maybe both, because there are two different kinds.) Before all the little cards and game pieces and such were falling out of file folders, or getting stuffed in binders. Now I can easily see what I need and I'm putting things BACK, too!

TIP: If you have a place for everything, it makes it easier to put it BACK when you are done, rather than leaving it in a pile to put away later.

I've shared this picture before. It makes me smile to see all those colorful bins lined up so neatly. These are our workboxes - the place we keep things we need during the day. (My kiddos do not have desks, so we need a space for folders and journals and stuff. You can read more about my alternative seating by clicking HERE.) This is truly a must for a classroom without desks. I tried having containers around the room for each type of folder/notebook, but I just don't have the counter space in my room to do that. I inherited the storage case, but I purchased the bins a few years ago (link here) when the old ones I had were too cracked and falling apart to be used any more. Having a place for things we use everyday helps with organization and still gives students a place of their own to store things.


I have so many of these containers from The Dollar Tree that they're my "go to" bins. Here they store our dry erase supplies. (The erasers are face sponges that come 3/pk from Dollar Tree.) I also use these bins to display books that go with a theme or author we're studying at the moment. They're sturdy enough so they don't topple over.


My writing paper is stored on these trays. The top 2 shelves hold everyday paper, the third shelf has final copy paper and the bottom shelf is scrap paper. Definitely keep a pile of scrap paper around and USE IT! Doing one of those flip flap activities? Have them glue it to a piece of scrap paper. Drawing a quick idea? Sharing a thought? Scrap paper works perfectly! I always encourage my kiddos to use scrap paper when they can so we're helping the environment. Having a stash of it easily available has made me use it more.


These black and white baskets are my saving grace for planning! The top shelf holds things we will use during the current day. Books, copies, games, whatever it is, it goes in the basket. The baskets are right next to my chair by the carpet so I can reach for anything I need for the lesson. Put sticky notes, markers, cubes.... kids need it for the day and I put it in the basket.  The second shelf is for things for the following days or week(s). Things I have copied ahead, extra math fact sheets, books I find that I want to remember to use.. those all go in the second basket. The third basket usually holds books for later - small group copies I'm not using yet, read alouds, etc. I also have my accordion-file with my "I Can" statements" in there. The bottom basket holds general "stuff." This has been my way of organizing what I need to teach for the longest time and it works for me!


I do still have a desk. But it's more like a storage area because I never sit there! It's one of those old-fashioned wooden desks with the pull-out tray for correcting papers. I refinished it and I love it. I have one of those toolboxes that so many people have that holds staples and pens and all those little things. I also have a 6-drawer Sterilite container that holds sticky notes, stickers, sharpies, note cards and those other things seem to need all the time. The black file folder holder in the back of this picture is where I'll keep folders for current things we're working on, book order info, etc. The black bin in the front holds my meeting notebook (which I divided into sections with small sticky notes), as well as things I'm using at the moment. Now it has DRA assessments and a couple books I want to remember to read to my kiddos. I really try to be good about cleaning this out every Friday afternoon before I leave, or it quickly becomes a place to just stick things!


TIP:  Take a few minutes at the end of each day to do a "sweep" around the room and straighten and put things back. Taking 10 minutes each day can really make a difference!

And finally, these little babies have saved my sanity! I can't take credit for the idea, but another genius person came up with the simple solution to all those scraps of paper from activities that involve cutting and pasting. I call them "trash tubs" and when we're doing any activity that involves scissors, one of my kiddos will come and grab these and put them around the room where everyone is working so they can put their scraps inside.  Soooo easy-peasy! No more kids trying to bring little scraps to the trash and dropping them along the way. Clean up is so easy now!


There you have it! Between this post and my other post, I've given you almost 20 different ways to use baskets, bins and containers to stay organized! Which one was your favorite? And how else do you use containers in your classroom? Leave a comment and share your ideas!

post signature
Happy Saturday everyone! This week was CRAAAAAAZY! I just looked back today and realized I took pretty much NO pictures this week and we had so much great stuff going on! I haven't linked up with Kacy at Doodle Bugs Teaching in a while, so I'm going to use the photos I have and do a little Five for Friday, Saturday style!

http://doodlebugsteaching.blogspot.com/2015/10/five-for-friday-linky-party-october-23rd.html


Parent conferences. This is what kept me so busy this week. I really enjoy meeting with parents and talking about their child's progress and how we can work together to make that possible. I met most of my families during our Open House earlier this year, and it was nice to chat again. I also was glad to finally connect with a few families I hadn't yet met. Now that everyone is on the same page, I feel so ready to tackle the year! I created some forms for myself and share a few tips and tricks for making conferences run smoothly. If you missed it, you can check it out by clicking the image below.

http://2gradestories.blogspot.com/2014/10/parent-conferences-its-that-time.html
 

Senior night field hockey game. Sigh.... where has the time gone. My beautiful and sweet niece had her last field hockey home game on Thursday night. She might play in college, but high school is finishing and it is bittersweet. We were on such a high after the game because her team played to a 2-2 tie. Which may not sound like much. Except that the field hockey team has not won a game- EVER, in the 4 years she has played. When she started playing, they would lose by MANY goals. But thanks to a wonderful coach and the positive vibes and hard work of her team, they have made a tremendous turn-around. It always so disheartening to watch those girls play their hearts out and lose every time. This was like a win for us!
 

I absolutely LOVE the new book I found thanks to Amy Lemons and Katie King. I Need My Monster was such a fun book to focus on this week during our reading time. We sequenced events, worked on asking and answering questions, talked about character traits and finished with a little readers theater. My kiddos had SO much fun using different voices for each character, based on what we knew about each monster. Some of the activities we did are in their "Rooted in Reading" resource for October. You can find out more about that {HERE}.


 I was on the lookout for some great apple recipes so I could make something different with my kiddos on Friday. (They've done the applesauce thing a million times.) Each of the second grade teachers created a fall activity to do and we rotated each of the classes through for the day. Students got to do some science exploration with apples - do they sink/float? why do they turn brown?, sorted and weighed acorns and other nuts and graphed their findings, and wrote a haiku about falling leaves. I decided to make apple butter with my crew and it was delicious! This is the recipe I used. (I put it in the crockpot for a few hours, but then transferred it to a burner/pot to heat a little quicker because we only had a short day with conferences on Friday.)

http://www.thegraciouswife.com/homemade-apple-butter-2/
 
 
Looking to check out some other second grade bloggers? This month's featured teacher for "Take a Second to Peek into 2nd" is Suzy Palmer from On the Go Teacher Mama. You can click on the image to visit her blog and learn more about her. Suzy has some great tips on her blog and her TPT store is filled with task cards (with a without QR codes) for just about anything you would need! Her Spooktacular Math Centers Bundle is on sale through this weekend - perfect for the spooky happenings that may be going on in your room next week.
 

http://onthegoteachermama.blogspot.com/
 
https://www.teacherspayteachers.com/Product/Spooktacular-Math-Center-Bundle-2nd-Gr-CCSS-aligned-1490178
 
Alrighty. That about covers it. My week has been so crazy I'm looking forward to spending the next two days in my jammies planning for next week and catching up on some things. Enjoy the weekend!

post signature
Back to Top