Happy Saturday, friends! Welcome to the weekend!

I'm jumping on with a quick post so I can show off my brand new blog design! Eeek! Isn't it fantastic! The wonderful Megan Favre over at A Bird in Hand Designs (also from I Teach What's Your Superpower?) created the new look for me. I looooove the bright and streamlined design of the Georgia Lou Studios templates. And the mobile view..... swoon! But if you're reading this on a tablet or phone, then you already know that!

And the best part - my new froggy!!! I cannot tell you how much I am in love with this little creature! She was custom designed by Sarah Pecorino, a fellow New Englander and I am in love! Sarah knew exactly what I wanted and created a froggy filled with personality. She has some great clip art in her TpT store - her style is so bright and cheery.

Both Megan and Sarah were so easy to work with and were very responsive to my (slightly obsessive?) requests. Be sure you check out all their social media and stores for great clipart, blog design and more!

So what's new in second grade this week? We have been working our little brains to the limit with some subtraction with regrouping. This is one of those concepts that kiddos either get pretty easily, or need A LOT of support to be comfortable with.

Here's my biggest tip for successfully teaching this skill: have a STRONG foundation of place value in place before you even try to introduce this concept.  We did a little place value review for a day or two before we began this topic. We reviewed, practiced, enriched and scaffolded using games as one of our math group rotations.
https://www.teacherspayteachers.com/Product/Place-Value-2315966

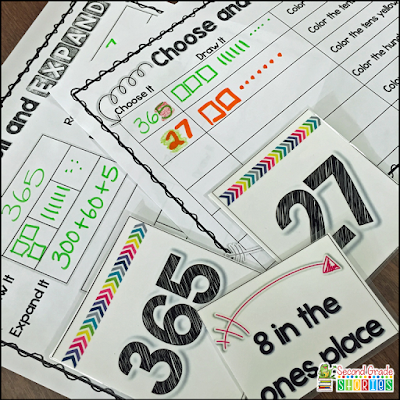
The thing I love about these games is that the cards meet EVERY child's needs. Working on 3-digit numbers? No problem. Need a little review with 2-digit - you're covered. Ready for some enrichment? It's all there. Everyone played the same games, but used whatever cards they needed to practice with. Instant (and easy!) differentiation! (The game resource is available in my store - you can check it out HERE.)

Once we had reviewed place value, we were ready for the subtraction to start! Another thing that is sooo important with this skill is to make sure students know they WHY before they know the HOW. Just teaching the algorithm does no good if students don't understand why they're moving all those blocks around.

My favorite way to introduce this concept is with these easy-to-make boards.
http://2gradestories.blogspot.com/2015/03/subtraction-with-regrouping-transition.html

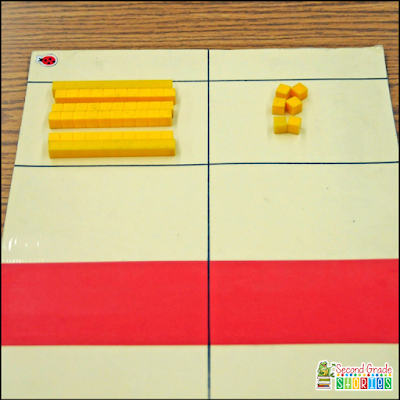
These boards, along with base-10 blocks or place value disks (I have used both successfully) work as a great transition from concrete manipulatives to the abstract algorithm. They give students a clear picture of how the process of regrouping works and gives them hands-on experience moving those blocks around. By the way - I have started calling it "ungrouping" now, instead of "regrouping." That might not be a new term to many of you, but to me it was brilliant! My kiddos instantly understood the difference between REgrouping in addition and UNgrouping with subtraction.

Ready to see how these boards work? Click HERE (or on the image above) for a step-by-step tutorial showing them in use. Not ready for subtraction yet? You can use the boards for addition with regrouping, as well!

There are so many different ways to help students understand this skill. I hope these boards have given you one more tool for instruction!


Happy Sunday, everyone! Baby, it's cold outside - and snowy! And that's exactly what it was like INSIDE my classroom on Friday. The room was transformed into the coldest and windiest place on Earth as my kiddos took a field trip to Antarctica to research penguins.


First, I need to share with you where this inspiration came from. I had originally planned to do a little "Winter Wonderland" while we were focusing on our science unit about matter. A few white tablecloths, some snowflakes and LOTS of hands-on content about the changing states of matter with a snow theme.  Great idea.... but... honestly, I just wasn't feeling it. And #realtalk - my kiddos' behavior right after winter break had some room for improvement. :-) I decided to wait until we got back into the swing of things a little more and put the snow theme on hold. Thennnnnnn.... as I was driving through town one day, I noticed a house with about a dozen wooden penguins on the front lawn. I've seen them before. Very neat. But that day I started thinking.... what if I could BORROW a penguin or two? How cool (haha!) would they be in our classroom for a little penguin study? Well, thanks to my wonderful custodian who lives in town, 6 of those little guys were set to show up in my classroom for Friday!

I could have stopped there. Really, I could have. A plain old "penguin party" would have been plenty of fun. But no. I got a little crazy. And the result.... Antarctica!

Let's back up a bit. The day before our "trip," I sent home this note with my students:


I also told them we would be taking a field trip the next day and the note had important information about where we would be going. This may not have been a good idea. Have you ever told a group of 7 and 8-year olds they were going on a field trip? The room erupted with squeals of delight and conversations of who they wanted to sit with on the bus, where we were going, was it just our class.... I was VERY worried they were going to be disappointed when they got home and read the note. (FYI - they were not. :-)

Now it was time to get to work! I started by moving everything I could out of the room. This was not too bad because of three things: (1) There is an empty classroom right across from me where I could put everything, (2) A LOT of my bookcases and stuff is on wheels, and (3) my floor and walls are white so that really helped! A few more trips with the little stuff and some help from a friend moving the tables and I was ready to start the transformation!


I had scoured Pinterest and seen a few ideas about using crumpled up butcher paper to make an ice castle. This became my go-to idea. I simply crumpled up pieces of white butcher/craft paper and them smoothed it out a little. I taped it to the wall, each other... whatever was nearby. Voila! Instant icebergs!


I had seen Hope King's amazing classroom transformation using white tarps or dropcloths hung from the ceiling - but I couldn't find the replay anywhere I couldn't really figure out hw to make that work. I only had clear tarps (and I really didn't want to go out and buy more) so I hung the one I had from the ceiling (binder clips on the tarp and paper clips under the ceiling tile borders) and then put an iceberg below. It worked to sort of hide what was behind the tarp.


The penguins were the finishing touch - and they're really what made it all come together. They are wooden cut-outs with wooden or metal stakes behind them to go into the ground. I stuck them in a milk crate so they would stand up and covered the crate with butcher paper.

A few snowflakes hung from the ceiling (from Party City), penguin facts on the icebergs and we were ready to go!  (Note: I decided NOT to take down the lanterns from my ceiling, even though they didn't exactly go with the theme. This is real life here and I was doing all this by myself and by 9:30 that night the thought of taking them down and then having to put them back up the next day was just too much. One of my colleagues said it was like the "Antarctic borealis!")


And what did we DO in this bare and frozen place? We researched penguins, of course! I opened the windows and put on the fan before they came in, just to really set the stage. (And believe me, it FELT like Antarctica with that!) Their first job was to come in and read the fact posters around the room (thanks to A Year of Many Firsts) and write down some interesting facts they learned. This gave everyone a chance to come in and get settled before we started our day.

We used a readers theater as the basis for much of our morning learning. After charting ways we thought penguins could be the same and different, students worked in partners to read the script together first, then complete the penguin species chart (using information from the script). We shared what we found and then we performed the readers theater, complete with penguin species head bands and an iceberg as a prop. (You can see more about the readers theater by clicking on the image or clicking HERE.)

https://www.teacherspayteachers.com/Product/Penguins-2312291

We began the afternoon with a penguin read-aloud. We had already read The Emperor's Egg, a story about how an Emperor penguin takes care of the egg and chick. We charted all the jobs the father penguin had and the challenges he faced. But what about the mother? Was she just off swimming in the ocean partying it up? After reading A Mother's Journey, we realized that the mother penguin had just as tough of a job as the father! Time for a little writing - which one do you think has it tougher, the male of the female Emperor penguin? I don't have any pictures of this (???), but here's the writing template we used, if you'd like it. Just click on the image.

http://bit.ly/penguinwriting

We finished up the day with some movement - waddling with an egg on our feet, just like an Emperor penguin. My kiddos had to waddle across the room without losing their "egg." Then came the storm.... cue the open windows and fan again! The "penguins" now had to huddle together with their "eggs" to keep from freezing. I have a feeling this may have been the best part of their day!


I loved this transformation for a few reasons: (1) It was relatively easy to do - for me at least. I did it all pretty much by myself and though it took a few hours, it wasn't hard. (2) There was a LOT of content. My students knew soooo much more about penguins by the time they left - and not just the facts everybody knows. They were so excited to go home and share what they had learned with their families. (3) I was enthusiastic about it! If I had done the "winter wonderland" idea like I had originally planned, my kiddos would have had fun, but my heart wouldn't have been in it. By doing something that was just as engaging for ME as it was for THEM, we ALL had a great day!

If you have any questions about our Antarctic adventure, or want to know how I did something, feel free to email me at secondgradestories@charter.net. I'd be happy to share ideas!

post signature
Happy Wednesday, friends! I knew that although coming back to school after Christmas break would be hard, my kiddos and I would find our groove quickly - and I was right! It was so nice to come back and be in my "school-home" again. We are reading to roll into a great new year!

Back in September, I made some BIG changes in my classroom.. I had been reading about alternative seating and its benefits and was ready to try it with my second graders. Here we are now in January and I am sooo glad I did it! There's been lots of talk again lately about changing to alternative seating. In October I wrote a blog post for ITeachSecond sharing the ups and downs of alternative seating in my classroom after the first 6 weeks of school. I have decided to share that same post here, in hopes of reaching more of you who are thinking about making the switch. Today I'll be sharing my original post from October. Later this week I'll be back with answers to some of my most asked questions about alternative seating. The best advice I can give - try it!

I really started thinking about alternative seating earlier this summer after reading research about how important it is for students to have input and choice in where they work in the classroom. I know I prefer different work spaces depending on what I'm doing. When I'm planning, I'm usually spread out on the floor of my living room. Creating TpT resources requires a quiet environment with my laptop on a table. Curling up on the couch is my favorite way to read a book. I know that I'm more productive when I'm comfortable - why wouldn't the same be true for my students?

That being said, since this was going to be something I TRIED - and wasn't completely sure about! - I didn't want to invest money is seating that wasn't going to be used. I was determined to use what I could find and borrow, but was willing to spend a little money to make it work. I also knew that I was going to have to put some clear guidelines in place to make this work.

So how have things been going? I am excited to share that my kiddos have ROCKED choosing their spots and they LOVE having choices for where to sit as they work.  Here's what they said:

"I like being able to choose where I sit to work. I can sit where it works best for me."
"I sit in different places for different things. I like to write with a clipboard in a camping chair, but I like to read sitting in a regular chair."
"Choosing our seating makes us responsible."
"It's important to have a comfortable place to work and everyone is different."

Let's take a tour of my classroom and I'll show you my seating choices and let you know how each one is working with my kiddos. We'll start with an overall view of my room - from the front, side and back. You can see it's pretty open. That's what I wanted. There are different seating choices throughout the room.


Here's a look at each type of seating in detail.


This was my first idea for alternative seating. Thanks to Greg at Kindergarten Smorgasboard for the idea! I got four bath mats from Target and WalMart. I didn't get the cheapest ones because they seemed thin and I was afraid they would wear quickly. I also chose colors that wouldn't show dirt too quickly.
The bath mats are a definite hit! They are easy to take out and clean up, can be put anywhere in the classroom and more than one student can sit on each one.


Not many negatives for these! The only issue is while they are better than working on the floor, some of my kiddos still find it uncomfortable after a while.


This was an easy one to switch out. I replaced the two chairs I used in that space with stools. (I had used these stools in my room last year for my listening center. I spray painted them black last year.) The table is put at regular height.

This is a great "in between" way to start alternative seating - regular table, different seats. It's simple and easy. The stools can be pushed under the table at the end of the day and stacked to the side when we're done.


This has worked really well, too! Only problem - some of my kiddos tend to fall off :-) We did a quick mini-lesson on how to correctly sit on the stools.

Next up - the low table and cushions. I took the legs off of this table and placed it directly on the ground. The cushions are chair cushions from WalMart. I know kids love sitting on the floor to work, so I figured this one would be a hit!
The idea was great. My kiddos loved sitting on the floor and working at the table. That's about it for the good part, unfortunately.


This table is currently at regular height again, with stools. Even without the legs the table was too high for my second graders to be able to comfortably work while sitting on the floor. Some tried kneeling while they worked, but it wasn't very comfortable. Even my tallest kiddos has trouble with it. I really want this alternative to work so I'm playing with the idea of making my own table and putting it on wooden blocks or something so it is the right height.


 I got these chairs from Amazon (link HERE) after seeing a similar one on a Periscope from Meg at Meg's New Box of Crayons. A little pricey, but I knew they would work. They could be washed off and wiped clean, were easy to move around the room, and they are adjustable to different angles.
Winner! I wish I could afford more of these seats :-) They are very comfortable, portable and give great back support, which is important for kids to be comfortable. They are without a doubt the favorite seating choice in my room.


Not really a negative, but the fact that they adjust meant we had to talk about putting the chair in one position and leaving it there while you work. No making "click click" sounds all the time and not getting anything done!

I knew if some of my kiddos were like me, they were going to want to spread out when they worked. I always have an open rug area in my room, so this was a no-brainer. (I also have another smaller rug area in the back of my room.) The one thing I did differently was to place the rug in the middle of the room, rather than in a corner.
The rug was already there - no cost! It's a great area for kiddos to spread out, or work in small groups.


None. I do encourage my kiddos to use seating like the bath mats and picnic chairs on the floor, rather than on the rug. That way more students have a place to work that is not on the cold tile.


This was as close as I was getting to a standing table. I couldn't afford to buy another piece of furniture, and the counter top is the perfect height for second graders. They can work right on the counter, or grab a clipboard. There is a table in front of the counter, which I thought might be good if they needed extra space as they worked.
 
For kiddos who prefer to work standing up, this is a great alternative. Again, it was already in my room, so there was no added expense, and it was the right height.


This has not been a space that has been used much in my room. At first I thought it might be because there was too much stuff on the counter nearby. But even after clearing a more open space, none of my kiddos chose to work there. I asked them why this choice wasn't working - they all said they didn't like to work standing up. I'm thinking this may just be the make-up of my class this year. The good thing is the counter isn't going anywhere, so if things change later in the year, the choice is still there.

 
The final seating choice in my room are my three camping chairs. I've had these for a couple years (I got them from Five Below). Prior to this, we used them as a special treat for independent reading. They are always in demand, so I knew they would be a popular choice this year.
 
I already had them, so nothing to buy. They can be easily moved anywhere in the room. They are comfortable and stable. Just grab a chair and a clipboard and you're ready to work!


I can't really think of any negatives for these chairs. They are a very popular choice! They definitely work best for students who can work with a clipboard on their lap.
There you have it! My experiment with alternative seating is no longer an experiment - I plan on keeping seating choices open for the year, and will do this next year, too! My students have become responsible for their learning choices and this has made them more invested in their day. The are quick to get started with their activities and are staying focused and engaged longer.
 
Have you thought about trying alternative seating in your room? I'd be happy to help you out by sharing my ideas and thoughts. Leave a comment, or you can email me at secondgradestories@charter.net. Start small! Look around and see what you have available and how things can be repurposed. Then go for it! If it doesn't work, you can always go back to a traditional seating plan. But I bet you'll find at least something that you love about alternative seating - and most importantly, so will your students!

post signature
Happy New Year, everyone! Do you celebrate the new year with your kiddos?  I'm teaming up with a bunch of my second grade friends to bring you some great ideas to start out the new year.


Christmas break can feel like a loooong time to be away from the classroom, whether it's a full two weeks off, or just ten days -  like I had!This is the perfect time of time of year to re-establish those connections you had with your students - and that they had with each other. It's also a great chance for you to try out some new (and easy!) ways to build an even stronger classroom community. Here are 5 simple ways to build classroom community in the new year.


Greet every student at the door.
You can do this whether your students arrive a few at a time, or all at once. A cheery "Good morning" and a smile can change the way a student's day has started. Use those few seconds to say hello, give a high five, ask about their morning or previous night. It's a great way to take the pulse of each student's morning, and allows you to catch any issues that might need to be taken care of before the day starts. Greeting students at the door, (I like to do it outside the classroom as they come down the hallway) sets a positive tone for the day and lets students know they are welcome and loved.


Change up your "sharing" routine - or start one!
I'll be honest. I used to think that "sharing" was not worth the time. The last thing I wanted to do was spend 10 minutes (or more!) of my day watching students do the "bring and brag" thing. And you know what? That kind of sharing really doesn't build community if it's done all the time. I allowed my students to choose whatever they wanted to share at the beginning of the year. Some chose to bring something in, others chose to share about something that happened, somewhere they went, etc. This definitely gave me an idea of what each student liked, what they were interested in, etc. But I wanted to find out more. So I started a monthly topic for sharing. In November, we shared things about our family, traditions we had and how we celebrated holidays. December was all about looking back at the year - accomplishments (sports, clubs, school and life!), fun places people went, and how we've grown. These sharing topics really gave me great insight on my students' lives outside of school and we all learned about each other. Knowing your students OUTSIDE of school is another important way to build community.


Have breakfast together! (or snack, or lunch, or a treat!)
Think about it. How nice is it when your entire family is home together and enjoying each other around the dinner table? I know it's harder and harder to make that happen these days, but the sense of community that comes from everyone together in a relaxed environment cannot be denied. I do this 3 times a year with my students - once in mid-October when we've gotten routines established and that connectedness if starting to come together; again in January when we comeback from break, and once more at the end of the year. Bring in a few boxes of cereal and some milk (have parents donate if you want!) and have breakfast together in the classroom or cafeteria! Talk about anything that comes up and just ENJOY being with each other. Can't bring breakfast in? If you have a breakfast program at school, you might be able to have everyone come down at one time and get/eat breakfast together. If breakfast isn't an option, eat lunch together, or snack. The idea is to do it TOGETHER in a different way than usual.


Read aloud every day
How many times a day do you read a book aloud, just for enjoyment? If it's not at least once a day, then this is the time to start! I'm not talking about actual reading instruction, or chapter books you read together after recess (which are, by the way, a GREAT way to build community!) I'm talking about reading JUST. FOR. FUN. I keep a pile of books by my rocking chair that I enjoy reading. They don't always go with the topic we're learning about, or even the season! But they're fun to read and I like the story. I pull from that basket at least once a day when we have a few minutes before specials or lunch (ever read to kids while they're in line?), when an activity finishes early, etc. But the best part of the read-alouds has been getting my students involved. Some like to choose the book from the basket. Others have books in the classroom they enjoy - or bring from home. And others like to READ to the class. We started reading a book everyday while waiting for buses to be called. It ended the day on a quiet note and allowed for more discussion, and sometimes silliness - which is ok! - than during the regular school day. And that brigs me to number five on my list.


Don't be afraid to laugh and be silly
I think we as teachers often feel we have to be in complete control all the time - and that control means no laughing and fooling around. But we are missing out if we think that way. Kids love to laugh. Silly is their middle name. Do something unexpected and don't worry is they class erupts into laughter and everyone next door and down the hallway will hear and wonder what in the world is going on in that classroom. Who cares! What's going on is you and your students are having fun and sharing a moment together. I'm not suggesting getting out of control, but life is more fun when you laugh. Wear a silly hat when you're reading, crack a joke in the middle of the math lesson, laugh at what your students think is funny. By letting down your guard just a little and allowing students to see you as a real person who they can relate to, you're building the most important connections and community that you possibly can.


Are you ready to go back to school in 2016 and build an even stronger classroom community? Help your students reconnect with each other and start the new year off right! If you're looking for ideas n how to start, run or energize your morning meeting, you can check out my posts {HERE} and {HERE.} I'd love to hear other simple ways that you use to build community in your classroom. Share in the comments!


post signature
Back to Top