The fun has started! I'm loving teaching first grade for the first time in 20 years -- even though I had forgotten how TIRED those little guys get you! We've finished two weeks of school (a 3-day week and a 4-day week) and now that I've gotten a handle on things, I'll take you on a tour of my new classroom.
As we go through each part of the room, I'll share some helpful tips and ideas, as well as links to where I purchased items. Here we go!

Here's a view of pretty much my whole room. We got new tables this year. Yes, they are bright and clean. But they take up WAY more space than my other tables and I'm still getting used to them. (If you're thinking the tables look too high, you're right :-) They hadn't been adjusted yet when I too this picture.) Each table has a basket with a pencil can and community crayons. At least, they did at first. Community crayons are tough for first graders who use their crayons ALL THE TIME. Plan B was those plastic sandwich containers from The Dollar Tree. Perfect. Until they had to open them. The lids fit so tightly most of my kiddos either couldn't get them off without help, or they pulled to hard and cracked them or sent the crayons flying around the room. Now we are using zippered pencil pouches for each person. Those work much better.... except for the crayons that keep getting left on the floor. Sigh..... And the baskets at the tables have to be that big because of the big HOLE in the middle where the tables fit together. But I digress.....

As you come in the room, there is a bookcase with some of my "teacher books." These are mentor texts we'll use for writing and reading, favorite authors, math concepts, etc. The colored bins are from
Steps to Literacy and are worth every penny. They don't tip over and they fit WAY more books than I thought they would. I was going to label the bins with those label holders from
Really Good Stuff, but it looked better without them.
The dismissal circles have been a life saver! Each student has a clip with a little square picture of them on it with their name. The clips stay pretty much on the same circle all the time, since most of my kids go home the same way each day. But if we have a pick up or different bus or whatever, I just have them move their clip to that circle. They check to make sure it's in the right place at the beginning of the next day. Easy, simple and perfect for a sub!

The entire back wall of my room has a counter going across it (and a HUGE HIGH empty wall... I had to be creative there!) Our lunch choice board is on the fridge (where else?!) Students clip their name on their choice for the day. The lunch ribbons are hung with these magnets from
Learning Resources. They hold up to 50lbs and are soooo strong. I already ordered a second set. Or ipads are stored in a dishrack. I like the dishrack idea, but as you can see, I still haven't figured out how to deal with the cords.
This charger is fantastic, though. It charges all the ipads at one time. The wooden cubbies are our mailboxes for things to go home. A friend of mine made them for me a few years ago because I got tired of the cardboard ones falling apart. These are so sturdy! Student names are velcroed on the sides. Here's a tip for using Velcro dots: alternate sticking the soft or hard side of the Velcro on whatever you're doing. That way you don't have to worry about being stuck with all soft sides and no hard when you're done! The trays on top of the mailboxes hold papers to go home. The subway posters are from
Hope King on TpT. The Sterilite drarers hold magnifying glasses, colored pencils and watercolors.

Here's a view of the room standing by the sink in the back. The whole left wall is big windows, which is great, but the view leaves a lot to be desired. (It's the side of an old metal portable classroom.) Not as much natural light as my previous room, but I'll take it!
Here's a closer few of a few things on and near the counter by the windows. We have two kids camping chairs as part of our flexible seating choices. The kids can move them around the room, but they "live" here when we clean up. Clipboards are kept in bins from Big Lots. They are the perfect size for so many things. Whiteboards, markers are erasers are here. I use face sponges from The Dollar Tree as erasers. They come 3 in a pack and I can wash them a few times a year. Completed work goes in the "finished work basket."

I think this is my favorite place in the room! The table was given up by another teacher who found it to be too big for her kindergarteners. I'm not sure how the white is going to look by the end of the year - or even by the end of the month! - but with the
white stools from Ikea (spray painted teal using
Rustoleum spray) and the
dry erase circles, it's a great spot for small group work. The
green rolling chair comes from Amazon. All the bins and baskets on the counter hold things for the day's activities, small group reading and small group math, along with a few of my teacher things. This is my main "desk" area.

This is the front of the room. Smartboard, rug area... nothing fancy. The chart stand was ordered from Amazon. I love it because it doesn't have those big storage bins on the bottom that take up so much room. (I can't find the exact one I got, but
this one is pretty close.) The
blue book holders on the whiteboard are magnetic. I bought them this year from Lakeshore. They are really sturdy.
This picture is taken from the front of the room by the coat room. Real life, people - see the seams on the yellow fabric??!!! I cut the fabric the wrong way and didn't have enough to cover it so I had to patch it. Ugh. The good thing is once we get an anchor chart up there you won't even see it. I made the headers myself. I don't like to laminate display things too much because of the glare. The boards will hold anchor charts, objectives and student work. Down the bottom of the picture you can kind of see one of the tables. I kept it raised up and my kiddos use it for a standing desk.

This is fast becoming one of my kiddos' favorite spots in the room. The rug is from Walmart. The book display will hold our theme-related books. I also have other books on top of the cubby bins. Those will hold things like authors, series and other books related to what we're doing. (Those book bins are from The Dollar Tree.) The colorful baskets are our "workboxes." This is where my students keep their book bags, writing folders, journals, etc. The shelving itself originally was for bins that hold math manipulatives, etc. A few years ago I replaced them with these from
Really Good Stuff. Their name tags are held on with book rings. (I have no idea where the original shelving came from, but
this one is pretty close.)

On the other side of our workboxes is the library area. The rug is from Target and the pillows are from Amazon. We call them "cushions" instead of pillows to remind everyone that your head does not go on them :-) I'm not going to go into the saga of the white book boxes that may or may not have caused me to shed a tear or two as I was setting things up. Suffice it to say those bins fit on the shelves and are big enough to hold lots of books. End of story. As we get into independent reading, I'll take the boxes that match my students' levels and put them ON TOP of the bookcase. That way they won't have to pull out the heavy bins everyday when they are changing out their books.

These are some of the other seating choices my students have when they are not sitting at tables. The
picnic chairs are from Amazon (I really should do an affiliate link for them... :-). The Hokki stools I got from a Donors Choose project (along with two of the picnic chairs). The bath mats are from Walmart and the lapdesks I have no idea! I have
another post about flexible seating HERE and I have a new one in the works for next week.
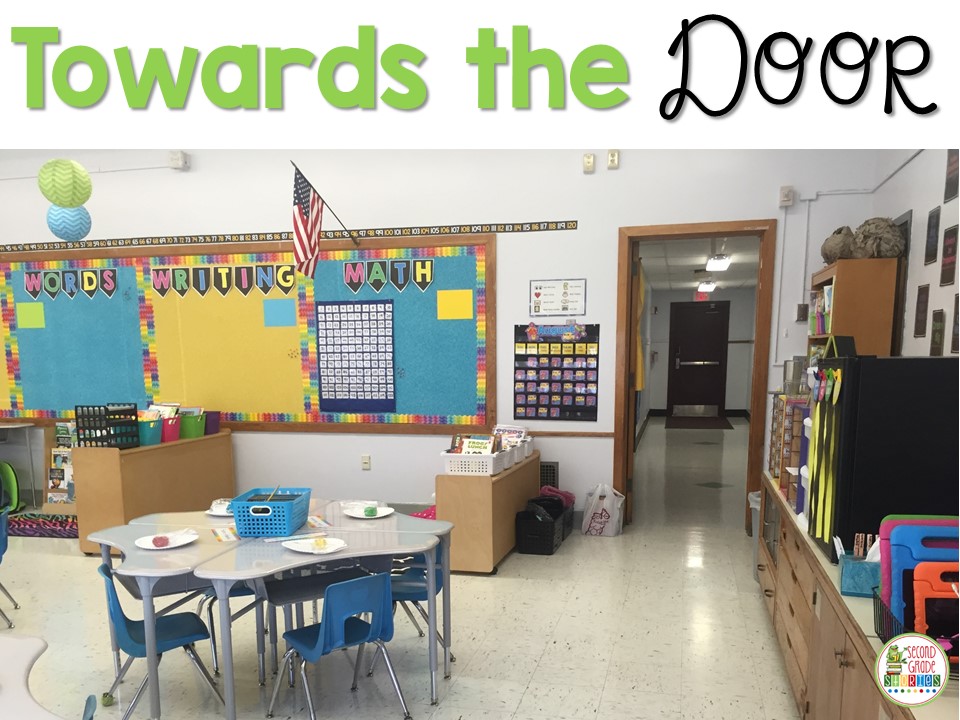
Here's one last view from the back of the room by the sink looking towards the door.
I'm loving my new space and my firsties are, too! We've already made some changes since I took these pictures to make traffic flow smoother and make a few things more accessible. I'm looking forward to a great year in first grade!


 I LOVE this book, and so do my kiddos. It's the perfect book to read if do a "disguise a turkey" project. (Check out THIS POST from Melissa over at Mrs. Dailey's Classroom if you're looking for some disguise inspiration!) The turkey's costumes are funny and kids really get the humor in this book. I like to go back and reread the book closely, looking for the things the animals say that relate to what costume the turkey is wearing. The story structure lends itself well to a problem/attempts/solution structure. I created a simple retelling sheet, as well as a response sheet for students to come up with their own costumes for turkey. This is an easy alternative to a big turkey disguise project.
 These next books go together - I have two of them, but I didn't know there was a third! The Great Turkey Race tells about how the turkeys save themselves from being eaten on Thanksgiving and how they decide to be good friends and save another turkey who hasn't been so nice! In The Amazing Turkey Rescue, the turkeys are back at the farm working to save their friends the chickens from the mean fox that has showed up. These are both great books to use for character traits, as well as story structure and problem/solution. I created some discussion cards you use to have your kiddos turn and talk - or with a small group - to talk about the stories. I also like to compare and contrast the two stories, as well.
 My final favorite book is not about turkeys - but about being thankful. It lends itself to a wonderful writing project. In the book, the daughter looks through her mother's scrapbook, asking about all the wonderful things she has done, and asking which is her "most thankful thing?" Of course, the Mom's most thankful things is her daughter, which brings the story to a wonderful ending. At the start of our writing activity, I ask my students to list some of their most thankful moments. Then we go through the list and talk about each one. This not only helps us be ready to choose our MOST thankful moment, but the oral discussion helps students be able to add details to their ideas when we start our writing. After everyone has one most thankful thing, we start our writing. We use a topic sentence, some details and have a great writing activity that not only shows what we are thankful for, but also helps me to get to know my students a little better, too.